Setting up a wired printer to print wirelessly can be accomplished by connecting it directly to your wireless router with an ethernet cable or, if the wireless router allows it, a USB cable and completing the printer setup on your Mac or Windows PC. This is called a network printer.
Once you've set up the printer, it will be available to any computer on your network. Your wired printer should have an Ethernet port or a USB cable that you can use to connect directly to your router. Use the Ethernet cable to give you a faster connection speed.
Connect the Wired Printer
Step 1
Plug one end of the Ethernet cable into an Ethernet port on your printer. Then, connect the other end to a port on the back of your wireless router.
Step 2
Make sure your printer is plugged in to a wall socket or battery backup.
Step 3
Turn on the printer if plugging it into an electric socket didn't power it on.
Step 4
If you have any issues try rebooting the modem and wireless router by unplugging the power cords from both
Wait one minute
Plug them both back in again.
You'll need time for the cache to build up. I usually tell my in home printer setup clients to reboot their computers. That clears the cache from the computer and gives the internet network time to connect.
Windows Setup
Step 1
On your keyboard press the Windows key and r.
Type in the word control
Press Enter on the keyboard
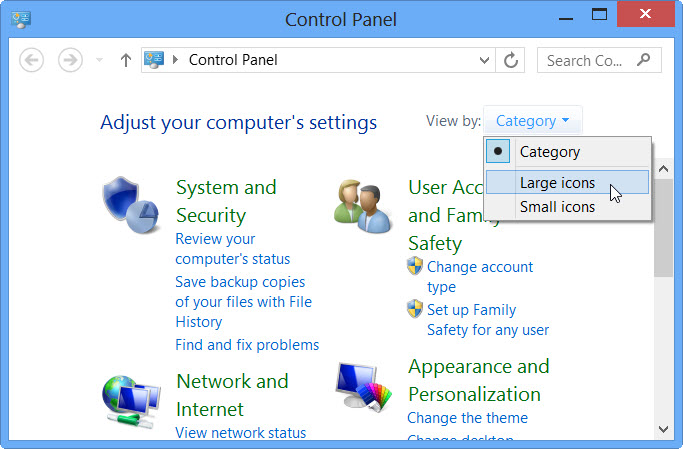
In the upper right hand corner see the type of view

If you're Windows PC is in Category view click Category view and select Large Icons.
Click Devices and Printers
Step 2
Click "Add a Printer" and select "Add a Network, Wireless or Bluetooth Printer" in the Add Printer window.
Step 3
Select the printer you connected to the network and click "Next."
Step 4
Click "Install Driver" and enter your username and password if the install procedure asks for them.
Step 5
Continue to follow the prompts in the wizard and click "Next."
Mac Setup
2019 Apple MacBook Pro (16-inch, 16GB RAM, 1TB Storage, 2.3GHz Intel Core i9) - Space Gray
Step 1
Click the "Apple" menu and select "System Preferences."
Step 2
Click "Print & Scan."
Step 3
Click the "Lock" icon and type in your password when asked. Click the "+" button and select your printer from the list. Wait for the printer drivers to download and install the wireless printer software.
Step 4
Click the Lock icon again to lock it.
The Absolute Easiest Way to Setup Your Network Printer....

Honolulu Hawaii and all of Oahu Text me, Rick Kirkham, 808.224.1870 to check my availability for a house call or office visit.
Some of these links are affiliate links. They cost you nothing to click on them and help to support my efforts in bringing you computer tips and articles such as the one you just read. Thank you for your support.


